Interactive tutorial and common questions
Plantaro ships with a guided tutorial inside the system itself: it opens the screens for you, highlights what matters on each one and explains the right setup order. This page explains how to use it and gathers the most common questions from people getting started.
For a complete route with sample data, see the Step-by-step tutorial.
How the interactive tutorial works
Automatic start
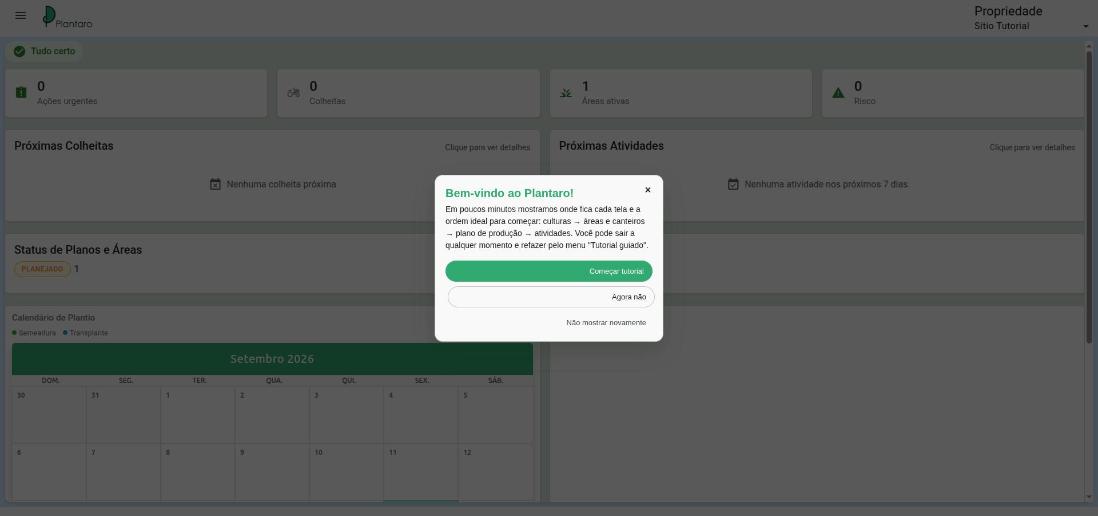
On your first access to Home (dashboard), a welcome card appears in the center of the screen with three options:
| Button | What it does |
|---|---|
| Start tutorial | Starts the guided tour. |
| Not now | Closes the card. It does not come back by itself, but you can start it whenever you want. |
| Don't show again | Turns off the automatic start. You can still start it manually. |
During the tour
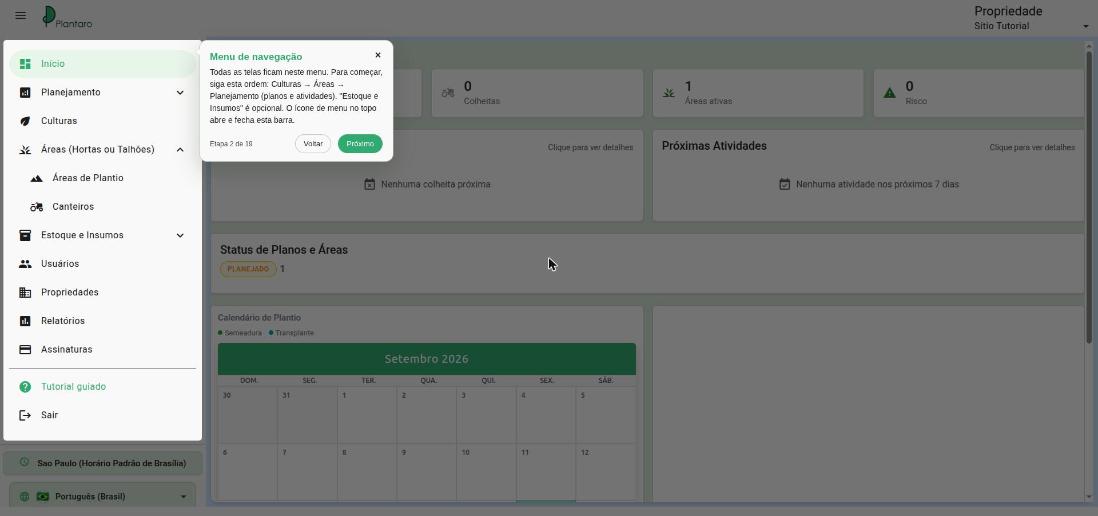
- Each step opens the matching screen and dims the rest of the page, highlighting the explained area. While the tutorial is open, clicks outside the card are blocked; to use the system normally, close the tutorial.
- Use Next and Back to navigate. The Next button is always available: no step requires you to register anything to continue.
- The Step X of Y counter shows your progress.
- Click the × (or press
Esc) at any time to leave. - In the Navigation menu step, the side menu opens by itself to be highlighted and closes on the next step.
Steps with an action: "Create … now"
On registration screens (categories, suppliers, supplies, crops, areas and plans) the card has a button such as Create crop now. It opens the real registration form.
- Click Create … now. The tutorial hides and the form opens.
- Fill in and save, or cancel the form.
- When the form closes, the tutorial continues by itself on the next step.
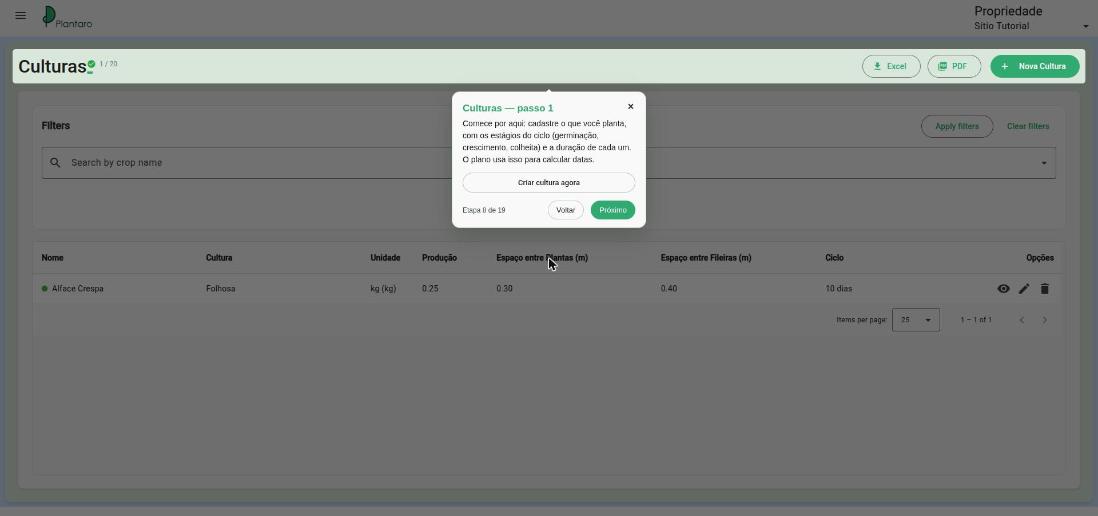
If the button opens no form (for example, because you reached the plan limit), the tutorial simply moves on.
Steps that adapt to your state
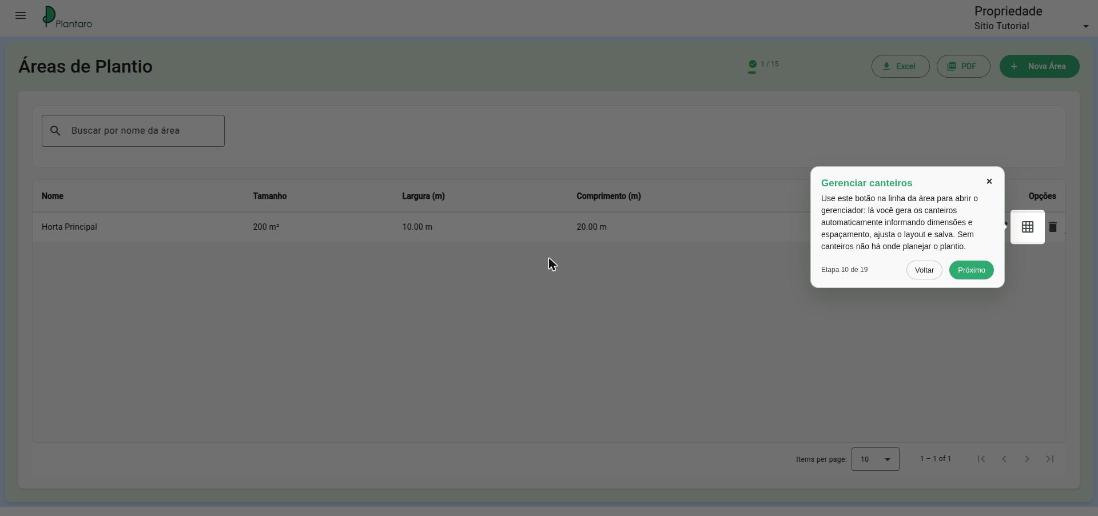
- The Manage beds step only appears if you already have an area. Without areas, it is skipped.
- If a screen is slow to load, the step shows as a centered card instead of freezing.
What the tutorial covers
Home, navigation menu, current property, Supplies (categories, suppliers, list and shortage forecast), Crops, Areas, Beds, Beds list, Plans, Tasks, Schedule, Upcoming plantings and harvests, Reports, Users, Properties and Subscriptions, ending with a quick route of the four essential steps.
Replaying the tutorial
Open the side menu (☰) and click Guided tutorial. It restarts from the beginning, even if you already finished or turned it off.
On mobile
The tutorial works on small screens: the side menu opens as a drawer on the menu step and closes right after, and the cards adapt to the screen width.
Common questions
I can't see the menu
The side menu is closed by default. Click the ☰ icon at the top left.
The system opened on "Subscriptions" and I can't reach Home
Your property has no active subscription yet. Pick a plan (there are free options) in Subscriptions. See Users, organization and subscription.
A window says I reached my plan limit
Each plan has usage limits (areas, beds, crops, plans…). To keep creating, upgrade in Subscriptions, or delete items you no longer use.
I can't create the production plan
The yellow box "The plan cannot be saved" lists what is missing. The most common reasons:
- Name or Area is missing.
- No crop was added to the plan, or it lacks desired output or start date.
- The area has no beds. Generate them in Areas → grid icon → Generate New Beds (see Step 5 of the tutorial).
- The crop was not registered yet, or has no stage.
I can't save the crop
At least one stage in the cycle is required, and all fields with * must be filled in.
The plan's end date looks wrong
If you typed the start date, check the Ends on value: day and month may have been read in swapped order. Pick the date in the calendar (icon at the right of the field) to avoid the problem.
I created the plan but it doesn't show in the list
The plans list has Start date and End date filters (by default, from today). Plans outside the period are hidden. Adjust the dates or click Clear filters.
The Tasks screen is empty
The list only shows the filtered period (by default, around today) and the tasks generated by plans. Adjust the period and check that the crop stages have Generate task checked. See Tasks, timeline, plantings and harvests.
My beds show in red or "occupied"
That indicates beds allocated to a plan in the viewed period. See Areas and beds and the canvas colors in Production plans.
The tutorial doesn't show anymore
You may have clicked Not now or Don't show again. Start it manually from Guided tutorial in the side menu.